Manuscript accepted on : 11 March 2016
Published online on: 25-03-2016
Process of Predicting the Hardness of Welded Joints Detail
Andrey Ivanovich Shveyov and Tatyana Vladimirovna Shveyova
Naberezhnye Chelny Institute, Kazan Federal University, Russia, 423800, Naberezhnye Chelny, Prospect Syuyumbike, 10a
DOI : http://dx.doi.org/10.13005/bbra/2060
ABSTRACT: The possibility of predicting the mechanical properties of welded joints of metal materials at the weld hardness example. Identified according to the quality of the images on the results of the parameterization of microstructures. The nature of the influence of defects of welded joints on the parameters of order and uniformity of structure. A probabilistic prediction algorithm based on the mechanical properties of the structure and characteristics of the calculation by calculating the temperature change during welding. The study conducted adaptation of the method of parameterization of microstructures applied to welded joints of austenitic steels, to establish the relationship between the conditions of preparation, structural defects and the results of parameterization.
KEYWORDS: Metal; welded joints; structure; hardness; uniformity; regularity; forecasting
Download this article as:| Copy the following to cite this article: Shveyov A. I, Shveyova T. V. Process of Predicting the Hardness of Welded Joints Detail. Biosci Biotech Res Asia 2016;13(1) |
| Copy the following to cite this URL: Shveyov A. I, Shveyova T. V. Process of Predicting the Hardness of Welded Joints Detail. Biosci Biotech Res Asia 2016;13(1). Available from: https://www.biotech-asia.org/?p=7439 |
Introduction
An important area in mechanical engineering is to improve methods of control structures, testing, forecasting and determining the mechanical properties of materials.
Currently estimate changes in the structure of metallic materials is carried out by conventional metallographic methods (Vashul, 1988) and mechanical properties – relevant research. However, traditional research methods do not provide enough accurate correlation of structure and properties, and require time-consuming sample preparation and numerous tests in accordance with normative documentation. In some cases simply unacceptable or impossible cutting samples for testing of existing facilities engineering.
Such tests cannot be performed using the methodology parameterization structures (Vstovsky et al., 1996). In connection with this future trend is to establish the relationship of mechanical properties (Kolmakov et al., 1997) of metal materials with the results of the digital image parameterization of their microstructure (Ivanova, 1994).
Theory parameterization (Bunin et al., 1998) through additional mathematical analysis allows to estimate the parameters of uniformity and regularity, characterizing the measure of violation of self-similarity and geometric heterogeneity reflecting the components of the image (Vstovskii et al., 2001). Under the parameterization is usually understood as a way of describing systems of different nature with the help of some quantitative characteristics that can distinguish and compare these systems to each other. In materials science parametrization used for the quantitative description of the structure of the studied materials. Such analysis algorithm successfully implemented in the program “MFRDrom” (Vstovskii, 2002), using which the mechanical properties of the structure does not require parameterization of a long and costly sample preparation and testing. The uniqueness of the program multifractal parameterization is that its author was first implemented in it the concept of multifractal dissymmetry, allowing processing and photographs of structures that do not have explicit ordering. The program is successfully tested in the analysis of structures of metals and alloys, as well as biological objects and in the analysis of petroglyphs.
However, questions parameterization structures, including welded joints, and the establishment of mechanical properties depending on their parameterization results are not yet fully understood. Determination of fractal characteristics in some cases allows you to set the structural changes, evaluate the adaptive properties of the steel structure, hazardous area change of the mechanism of deformation of steel, leading to a decrease of plastic properties, and increase the likelihood of brittle fracture. Multifractal parameterization method allows to diagnose the state of the material within the recommended technology (Galimov et al., 2009). This methodology allows for fine selection of material structure and, if necessary, reject the structures that are sensitive to the conditions of loading.
In connection with this urgent problem are complex studies aimed at adapting techniques parameterization framework for evaluating the mechanical properties of the different zones of welded connections of machine parts, which makes it necessary to develop an algorithm and evidence-based recommendations for the preparation of metallographic images.
The birth of fractal geometry associated with the release in 1977 of the book B. Mandelbrot “Fractal Geometry of Nature”, which is a branch of the theory of chaos (Mandelbrot, 2002). Fractal – is infinitely self-similar geometric figure, each piece of which is repeated with decreasing scale. Under the fractal (Ghazale, 2002) self-similar set, also understand non integral dimension.
Today multifractal theory (Kronover, 2000) studied in fields such as physics, mathematics, materials science, and others. Models obtained using multifractal theory more elegant (Kenneth, 2003) and often more adequately describe the objects of the world. Questions of self-organizing materials, irreversibility of processes and their nonequilibrium associated with symmetry breaking detail Questions of self-organizing materials, irreversibility of processes and their nonequilibrium associated with symmetry breaking detail the scientist (Ivanova et. al., 2000). In materials science, a number of works using multifractal parameterization, namely asked to evaluate the resource safe operation of chemical plants; optimize existing process parameters produce molybdenum wire and a correlation with the mechanical properties of multifractal characteristics of the structure; improve the mechanical properties of powder steels based forecasting of their structural condition; predict resource covers fusion reactors; investigate the effect of gravity on the structure of the double metal systems and evaluate the effect of the field on the formation of structures during crystallization; analyze geometric models bainitic-martensitic phases and a number of other studies. A review of the literature revealed widespread use of the multifractal parameterization of material structures and establishing linkages with the results of parameterization properties.
A number of issues related to the application of the method parameterization structures of welded joints is a challenging and urgent task.
Methods
Methodology multifractal parameterization structures of materials developed and described in the works of B. Mandelbrot, R.L. Hudson, A.G. Kolmakov, G.V. Vstovskii, I.Z. Bunin, V.S. Ivanova, A.V. Votinov, V.V. Gerov, A.S. Balankin, A.A. Oksogoev, A.D. Anvarov et al.
The object of the study were selected welds (AWS, 2007) the outer hull of the combustion chamber, made of heat-resistant austenitic steel “10H11N20T2R” (Russian). Metallographic thin sections were prepared on an automatic grinding and polishing machines. To identify the boundaries of austenite grains investigated steels used “Krupp reagent” with the etching time of 20 sec. The microstructures were investigated on a stationary microscope with a magnification × 1000 digital camera AxioCamHR to capture photos and videos, attorney Vickers hardness tester, a personal computer with software for image processing, “MFRDrom” (G.V. Vstovskii), office suite et al.
For clarity in the study were obtained panoramic image of the microstructure and different magnifications (× 100 – × 1000). Were investigated fit welds and discarded according to the results of the radiographic testing. In order to establish the nature of the influence of defects of preparation and structure to use images of austenite grains with increasing × 100, which was carried out on the basis of imitation defects (traces of grinding and polishing, cracks and pores).
For the analysis of the program required a special pretreatment-studied image of structures, which consisted in digital imaging with the use of computer graphics (such as the Adobe Photoshop). This training included clipping image fragments, conversion to black and white bitmap format, changing the brightness-contrast and others.
Processing a single image in “MFRDrom” includes (Vstovskii, 2001):
- Download the image file.
- Configure multifractal processing and conducting calculations (a method of generating measures, a method for calculating the type of the spectrum, the limits q, the number of decimal places to round performance, the minimum usable area of the image, the color that the program will be considered as a maximum, and others.).
- Study of multifractal spectra and save the results of calculations with viewing regression graphs for any q from the specified range and for any subset of the total set of scales that are generated by the program specified minimum share of the area.
Multifractal analysis of images includes the following four stages of calculations: generation of elementary measures partitions, calculation of the generalized correlation functions, the calculation of the statistical characteristics of multifractal spectra, analysis of the correctness of the calculated multifractal spectra.
To perform the multifractal analysis can be used by software module “Fraclab”, included in the software package MATLAB, as well as developed a software package “Fractal-PC”.
To match the chemical composition of the technical conditions on the investigated austenitic steel was performed spectral analysis of all samples and a series of measurements of the Vickers hardness HV30.
To determine the cause of cracking was performed microarray analysis of longitudinal welds (base metal heat affected zone, and weld line weld) the outer casing of the combustion chamber. The microstructure of welded joint heat-resistant austenitic steel with the detected center of crystallization of the weld shown in Figure 1.
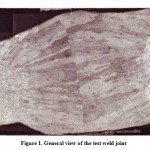 |
Figure 1: General view of the test weld joint |
Depending on the uniformity and regularity of the image resolution in pixels obtained from the analysis program “MFRDrom” series of 220 digital images of different resolutions steel with grain size from 1-10.
The main results obtained using visual, radiographic and spectral, metallographic analysis, measurement of the Vickers hardness according to standard procedures and by using standard methods of statistical processing of measurement results. The accuracy of the study provides a sufficient volume of the experiments, using a set of methods for determining the mechanical properties of materials and other types of tests on standard instruments attorneys, a sufficient number of samples.
The studies included three main stages. In the first phase establishes the dependence of image resolution, grain size and uniformity (regularity). In the second stage analysis of the effect of defects on the preparation and structure of the parameterization structures. In the third step establishes a relationship between the hardness of welded joints of austenitic steel and parameters of uniformity and regularity.
Results
Corpus of the combustion chamber is a welded construction (Chuan, 2010). Welding was carried out under the following conditions: a straight polarity, the welding current I = 160 ± 20 A, the welding speed v = 0.26 – 0.3 m / min, the tungsten electrode (4 mm), argon. When TIG welding of the body of the combustion chambers in the process occur hot cracks (Figure 2). For the purpose of testing the parametrization method for the study of defect sites on radiographic analysis (Figure 3) of samples carried out for such places in the weld.
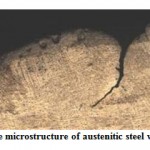 |
Figure 2: The microstructure of austenitic steel with a crack |
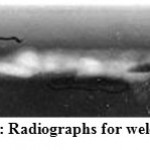 |
Figure 3: Radiographs for weld cracks |
To improve the accuracy and reliability of the prediction of hardness calculated temperature fields during TIG welding the outer casing of the combustion chamber drive the compressor. Investigation of the temperature distribution over the cross section limit state weld joint allows the modeling of the structural state obtained by cooling after welding, using state diagrams and by comparing the structures of the isotherms and the corresponding regions. Calculation of thermal field applied by known methods, in addition to the parameterization of structures for the prediction of the structure and hardness.
Initial data for calculation are selected as follows: material – steel, the thermal conductivity λ = 0.29 W / (cm ∙ K), Volumetric heat capacity c[pho] = 4.75 J / (cm3 ∙ K), the thermal diffusivity α = 0,06 cm2 / sec, the efficiency – 0.85, Ua = 22 V, the thickness of the parts in the welding zone s = 2,5 mm, butt weld in a single pass. As the reference temperature shall be based ambient temperature (Bagryansky et al., 1976).
Calculated methods of determining temperature fields based on the following equation of heat conduction in the case of three-dimensional body with the environment:

where ∇T – is the Laplace operator; a = λ / cρ – thermal diffusivity.
Along with the settlement method of definition of temperature fields in practice used experimental methods, which are widely used in various branches of engineering. In the calculations of thermal processes in welding is widely used depending obtained by schematization and simplification of the real processes of distribution of heat (Volchenko et al., 1988).
These assumptions allow to obtain a coherent theory of races, the temperature distribution in the bodies by heating the various moving sources of heat.
In this equation, the change of temperature in the plate in the process of heat-saturation described by the equation:

where K0 – Bessel function of the first kind of order zero, [delta] – plate thickness, – the distance to the considered point from the origin, a – thermal diffusivity, [lambda] – coefficient of thermal conductivity, t – time, v – speed welding.
The results of calculation of temperature (Konovalov et al., 2007) limit state ΔT are shown as a function of the change of temperature on the distance x from the center of the weld in Figure 4.
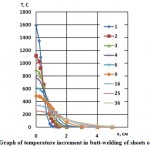 |
Figure 4: Graph of temperature increment in butt-welding of sheets of 2.5 mm |
Preparation of welded joints to the definition included in the program MFRDrom cutting and manufacturing microsection weld etching, photographing, video capturing, isolating the desired number of regions (n = 6), the required size of the microstructure, image conversion. Of all the parameters were chosen metallographic structure uniformity F200 and regularity D1 – D200, as the most informative parameters.
Together with the researcher Anvarov A.D. were obtained experimental data that allowed establishing the dependence of uniformity and regularity in the structure of a wide range of image resolutions (Figure 5). They were prepared on the main scale to determine the score #1 grain steel (1-10) with increasing x100 (Anvarov, 2006).
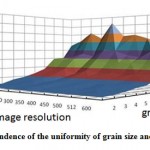 |
Figure 5: The dependence of the uniformity of grain size and image resolution |
Check and found that the resulting parameterization program “MFRDrom” regularity and uniformity affect the resolution of the scanner or camera, with which the resulting image.
Figure 4 implies that there is a fairly clear correlation between the grain size (z) and the homogeneity of parameters F200 (ordering D1 – D200 also) for the welded joint defect-free, allowing you to determine the grain size, the parameterization of structures in an automated. Results parameterization of austenite grains with pores (slag inclusions) of equal size are shown in Figure 6. The dependence is based on the analysis of microstructures size of 512 × 512 pixels with a resolution of 300 pixels / inch.
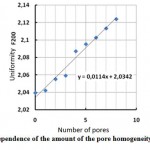 |
Figure 6 : The dependence of the amount of the pore homogeneity of the structure |
Analyzing Figure 6, we can conclude that orderliness and uniformity of structure welded joint affects both the number and size of pores or slag inclusions, as well as the size of cracks or signs of grinding and polishing (Shveyov, 2014). This should be considered in the preparation of thin sections and site selection studies (defect-free) welded joint, as Lots thin section with defects receipt and structures can distort the results of the calculation. These curves were obtained by simulating the defects on austenite grains of equal size and such orientation, i.e. for a fixed grain size.
We have been proposed hardness probabilistic prediction algorithm, which is shown in Figure 7.
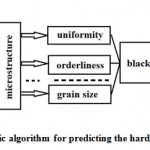 |
Figure 7: A probabilistic algorithm for predicting the hardness of the welded joint |
To predict the hardness needed for this scheme:
- Get the standard methods of metallography microstructure of the sample.
- Calculate using “MFRDrom” values uniformity F200, ordering D1 – D200 and grain size for different areas of the weld.
- Snap uniformity F200, ordering D1 – D200 and grain size Z to the coordinates of the welded join.
- Perform functions approximation hardness HV.
In steps 1 and 2 made reference inputs (simulation of the structure or intaglio), in steps 3-5 using the appropriate parameters are determined “MFRDrom” uniformity, consistency and grain size. In step 6 using the object “black box” the approximation functions. Thus, under this scheme, the hardness HV can be predicted by calculating the initial temperature increments (steps 1-7), or calculated based on the parameterization of the microstructure (steps 2-7) obtained in the microscope, scanner, camera, etc. To predict the hardness manner should be obtained regression equation homogeneity, consistency, grain score (perhaps other parameters) for particular weld microstructure with reference to the coordinates (x, y). Measurement of the Vickers hardness (Figure 8) in this case is also performed in the plane of the section (also x, y).
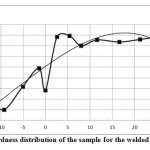 |
Figure 8: Graph of hardness distribution of the sample for the welded joint (experiment #5) |
In the future, setting out the “black box” of the object dependency HV30 = f (F200, D1-D200, Z, …) you can get the value of hardness in the welded joint in any coordinate with a given degree of accuracy determined by the accuracy of the approximation of functions. Prediction of hardness can also be carried out by normalizing functions, compiling a matrix of full factorial experiment planning, assessment of homogeneity of variance of the response function and calculating coefficients of a mathematical model.
This algorithm can be used in predicting the hardness in the welded joints of steel metal in areas where standard methods to identify difficult or need to restore the values for unmeasured areas.
Discussion
Adapting the parametrization method for the study of the structures of austenitic steels was training features images of microstructures of welded joints, different grain size of the weld heat affected zone and the base metal, the different orientations of grains after polishing and etching, the presence of defects of welded joints. The above factors affect the uniformity and regularity weld structure as a whole and in particular zones. When their research needs a rational choice of places to parameterize structures, the number of such sites, adjusted for possible bias modes and non-uniformity of etching, increasing the microscope and other factors, i.e., parametrization welds should be performed in similar conditions as possible. Carrying out such an analysis can be useful for predicting the hardness of metal parts in the areas of machines, where for any reason it is impossible to mechanical hardness test methods.
Incorporated into the program algorithm provides a tool for the automated analysis of the microstructure of welded joints to determine grain size, microstructure parameters and finally to predict the hardness.
Conclusion
Method parameterization structures tested and adapted to the study of microstructures welds made of austenitic steels, including defects. Found that the complexity of sample preparation for determination of parameters of multifractal hardness below 30% on average at the same measurement error than to determine grain size. The connections are established uniformity and regularity with grain size at different resolutions structure weld complement the existing and expanded depending on the resolved images for automated analysis of grain size. It is shown that the study parameters homogeneity and order of the structure should be carried out in the most similar conditions. It was revealed that the degree of correlation relationships affect the microstructure defects such as cracks, pores etc., As well as preparation of defects – traces of grinding and polishing. These defects affect the uniformity and regularity of the joint. The connections are established Vickers hardness with the order and uniformity. Invited to assess the microstructure and hardness of forecasting used only parameter homogeneity. The temperature field in the weld and heat-affected zone, depending on the welding conditions. Asked to predict the hardness by calculating the temperature of the processes occurring during welding.
Very urgent task is to reduce the complexity of determining the mechanical properties of welded structures. The authors did not investigate the matter parameterization bimetallic compounds and metals coatings. The task of further investigations included determination of hardness of the microstructure parameters only for other groups of materials and techniques, such as casting, forming, heat-treating and others. With a few changes can estimate the hardness of welded joints of austenitic steels and non-destructive products.
Gratitude
The authors are grateful to Amir Damirovich Anvarov for advice rendered in writing the article and in the experiments.
References
- Anvarov, A.V. (2006). Methods of assessing the resource safe use of chemical products based on methodology multifractal parameterization (Ph.D. thesis), Kazan technological university, Russia, Kazan.
- Bagryansky, K.V., Dobrotina, Z.A. and Hrenov, K.K. (1976). Theory of welding processes. Russia, Moscow: Higher School.
- Bunin, I.Z., Kolmakov, A.G., Vstovskii, G.V. and Terentiev, V.F. (1998). Methodology multifractal parameterization structures of materials. Vestnik TSU, 3, 293-294.
- Chuan, Song Wu (2010). Welding Thermal Processes and Weld Pool Behaviors. Taylor & Francis.
- Galimov, E.R., Kudrin, A.G. and Maminov A.S. (2009). Using the method of multifractal parameterization problems in metallurgy powder steels. Scientific and technical statements SPbSPU, 89 (4-2), 26-30.
- Ghazale, M. (2002). Gnomon. From the Pharaohs to Fractals (M. Ghazale, Trans.). Russia, Moscow: Institute of Computer Science.
- Ivanova, V.S. (1994). Synergetic and Fractals in materials science. Russia, Moscow: Nauka.
- Ivanova, V.S., Vstovskii, G.V., Kolmakov, A.G. & Pimenov V.N. (2000). Multifractal method of testing the stability of structures in materials. Russia, Moscow: Intercontact Science.
- Kenneth F. (2003). Fractal Geometry, UK: WILEY.
- Kolmakov, A.G., Bunin, I.G. and Vstovsky, G.V. (1997). Investigation of Effect of Surface Decarburization on Mechanical Properties of Molybdenum using Multifractal Formalism. International Journal of Offshore and Polar Engineering (ISOPE), 1(7): 44-47.
- Konovalov, A.V., Uneven, V.M. & Kurkin, A.S. (2007). Theory of welding processes. Russia, Moscow: MGTU of a name N.E. Bauman.
- Kronover, R.M. (2000). Fractals and chaos in dynamic systems. Fundamentals of the theory. Russia, Moscow: Postmarket.
- Mandelbrot, B.B. (2002). Fractal Geometry of Nature. Russia, Moscow: Institute of Computer Science.
- Shveyov, A.I., Ganiev, M.M., Shafigullin, L.N., Kurin, S.V., Gumerov, M.I., Galimov, E.R. and Belyaev, A.V. (2014). Special Aspects of Preparation of Microstructure Images for Parametrization of Welding Joints. World Applied Sciences Journal, 29 (4), 560-563.
- Vashul, H. (1988). Practical metallography. Methods of sample preparation. Russia, Moscow: Metallurgy.
- Volchenko, V.N., Yampolsky, V.M. & Vinokurov V.A. (1988). Theory of welding processes. Russia, Moscow: High school.
- Vstovskii, G.V. (2002). Elements of Information Theory. Russia, Moscow: MGIU.
- Vstovskii, G.V., Kolmakov, A.G. & Bunin, I.G. (2001). Introduction to the multifractal parameterization of material structures. Russia, Izhevsk: Research and Publishing Center “Regular and Chaotic Dynamics”.
- Vstovsky, G.V., Bunin, I.G. and Kolmakov, A.G. (1996). Information-theoretic Interpretation of Multifractal Formalism and Analysis of Metallic Fracture Surfaces. Engineering Materials Advisory Services Ltd. (EMAS), 1(2): 301-306.
- Welding Handbook: Welding Process (2007). American Welding Society: AWS.

This work is licensed under a Creative Commons Attribution 4.0 International License.


